Glazing Repairs: A Complete Guide to Restoring Your Windows
Key Takeaways
Glazing repairs are essential for maintaining the comfort, safety, and energy efficiency of your home or office space. This guide covers how to identify problems, when to consider a professional fix, and the best practices for keeping your windows in top condition.
-
Regular maintenance prevents small cracks from becoming major structural issues.
-
Failed double-glazing seals often appear as condensation between glass panes.
-
Expert assessment helps distinguish between simple repairs and necessary unit replacements.
-
Using correct materials and professional techniques ensures long-lasting and airtight window repairs.
-
Professional glazing services, such as those offered by PGS Glass Limited, provide peace of mind and technical compliance.
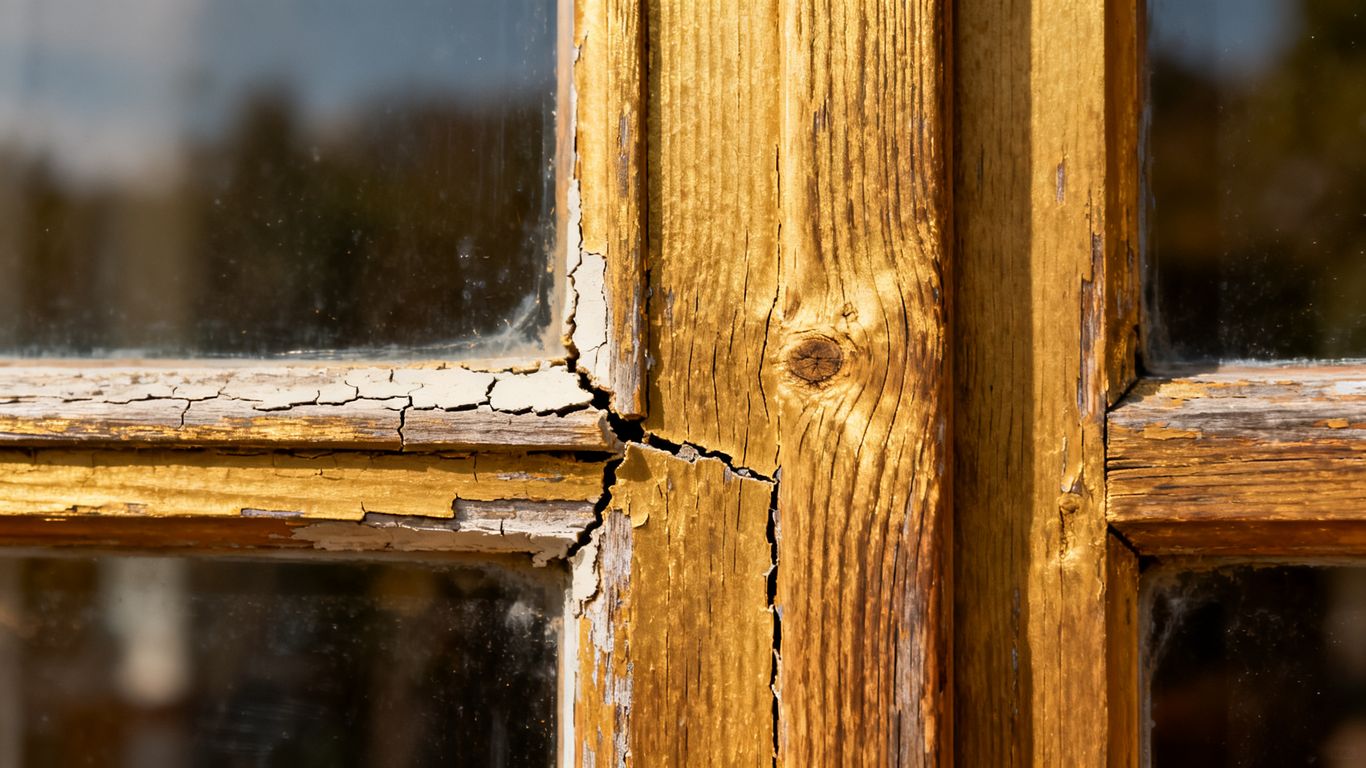
Understanding different types of glazing issues
Windows are constant performers in your home, naturally dealing with thermal expansion, external forces, and age-related wear. When these elements take their toll, you might notice subtle shifts in how your windows perform or look over time. Recognizing these signs early is the first step toward effective maintenance and preserving the integrity of your property.
Identifying common glass cracks and chips
Surface damage often starts small, frequently caused by impact from debris or extreme temperature fluctuations. Left untreated, these minor blemishes can expand across the entire pane. It is helpful to inspect your glass regularly to ensure small cracks do not turn into deeper, more dangerous fractures that compromise the glass strength.
Recognizing signs of failed double-glazing seals
Fogging or moisture trapped between two panes of glass is the most common indication that a seal has failed. This breach allows humid air to penetrate the unit, meaning your windows are no longer insulating effectively. If your units show these signs, contacting PGS Glass for professional repairs or replacement of the sealed unit is often the most cost-effective path forward.
Dealing with rattling window panes
Loose glass, especially in older timber frames, can be a major nuisance during windy conditions. This rattling typically occurs when the glazing putty has dried out, cracked, or fallen away entirely over time. Fixing it involves securing the glass properly, but we should look at how these issues manifest compared to other window defects:
|
Issue Type |
Typical Indication |
Recommended Action |
|---|---|---|
|
Seal Failure |
Condensation inside unit |
Replace sealed unit |
|
Loose Glass |
Audible rattling sound |
Re-glaze or secure beads |
|
Structural Decay |
Rot in wooden frames |
Patch repair or replace unit |
Addressing these issues quickly prevents further damage and keeps your living environment quiet and stable.
Addressing draughts and energy efficiency loss
Air leaks around the edges of your windows lead to increased heating bills and a colder home interior. These gaps develop when seals perish or putty shrinks, allowing unwanted airflow into your living space. We recommend keeping an eye on your energy bills as a primary indicator that your window airtightness may need serious improvement.
Identifying when to repair versus replace
Determining whether to invest in repairs or look at full-scale replacement depends heavily on the current frame condition. While some issues require a complete window swap, many common failures can be addressed cost-effectively through targeted professional intervention. A professional assessment helps define the scope of your renovation project.
Assessing the severity of structural damage
Safety is the absolute priority when inspecting your windows. If the frame itself is bowing, sagging, or showing signs of deep structural instability, repairs may only be a temporary fix. It is vital to consult with a qualified glazier to determine if the frame can support a new pane or if the structure has reached the end of its life.
Benefits of repairing heritage or original frames
Retaining the character of a period building is often a top priority for homeowners. Repairing your original frames protects the historical aesthetic and often proves more sustainable than installing new materials. Expert restoration can breathe new life into older windows, provided the core wood or metal remains fundamentally sound.
Weighing the cost-effectiveness of unit replacement
Replacing a single pane or failed double-glazed unit is significantly cheaper than a total window system overhaul. Many homeowners find that simple misted unit repairs address their clarity and insulation issues without the excessive disruption of removing full window sets. This approach keeps project costs down while restoring high levels of thermal performance.
When structural rot makes repairs impossible
If damp has penetrated to the core of your window frame, the cellulose structure becomes compromised beyond structural repair. Replacing these infected units is necessary to stop the spread of decay to the surrounding building envelope. In such cases, a complete installation is both safer and more prudent for long-term health.
Essential tools and materials for glazing repairs
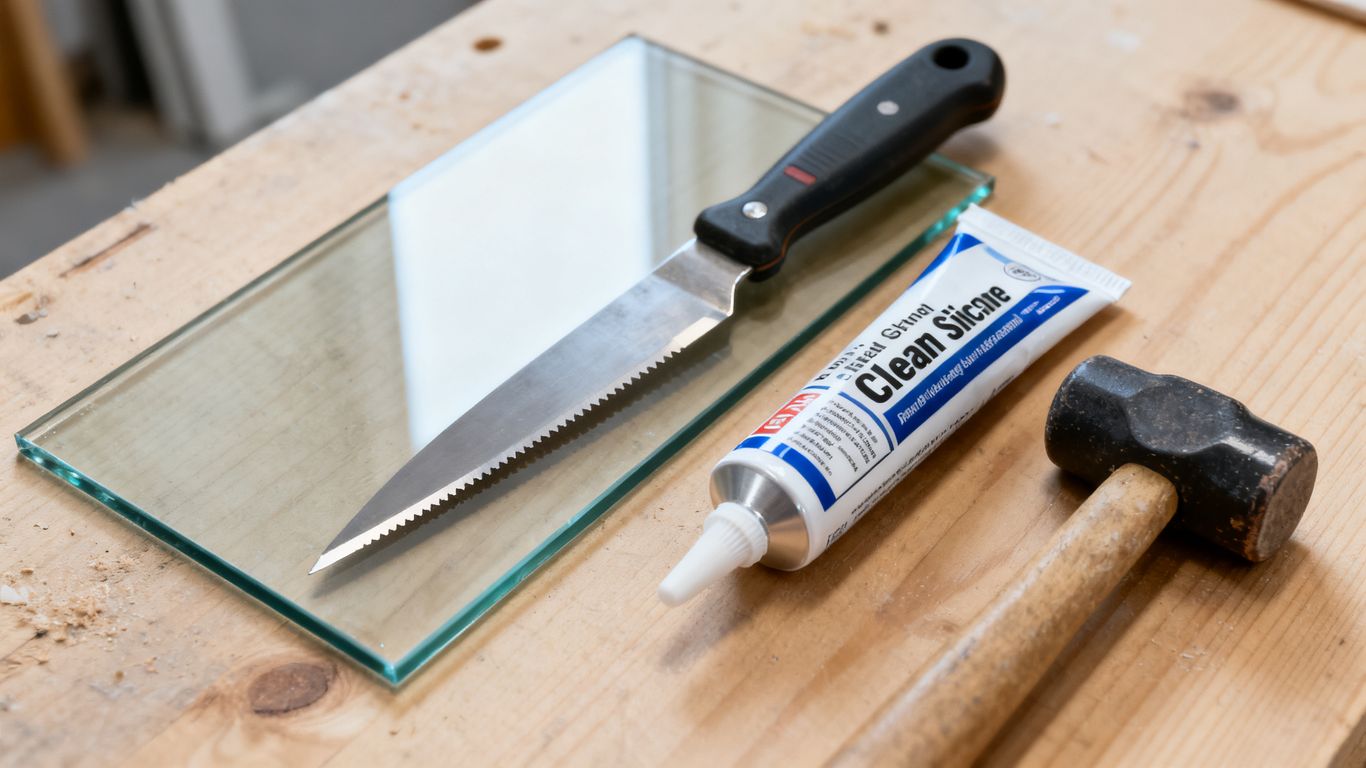
Equipping yourself with the right gear is fundamental for executing quality work. Professional results rely on high-grade sealants and precise manual tools to ensure the glass is seated correctly and behaves as intended. If you are handling complex repairs, especially at height, always prioritize the right equipment for the task.
Selecting the right glazing putty or sealant
Modern glazing tasks often require high-performance silicone or specific glazing compounds designed for durability. Compatibility with your window trim is key; using the wrong sealant can cause chemical reactions that degrade your frame finish. Selecting a high-quality, long-lasting product saves considerable time on future touch-ups.
Safety gear for handling broken glass
Glass handling is inherently risky, as even small shards can cause significant injury to hands and eyes. Heavy-duty puncture-resistant gloves and protective eyewear are non-negotiable for safe repair work. Always clear your workspace before beginning to minimize the risk of stepping on or dropping sharp fragments.
Must-have manual and power tools
Effective glazing requires a specific set of tools to achieve a clean look and a tight fit. Below is a list of essential items you should keep ready for your project:
-
High-quality glazing knife for removing old putty
-
Sturdy putty applicator or silicone gun for even distribution
-
Sharp wood chisel for clearing out tight rebates
-
Rubber mallet for gentle securing of glass and beads
-
Heavy-duty glass suction clips for easy pane maneuvering
Having these items ready helps prevent unnecessary frustration and helps ensure your project moves along efficiently.
Choosing compatible glass replacement types
Always match your replacement glass to the existing window specification to maintain thermal and acoustic properties. If your window requires laminated or toughened glass for safety, ensure that the chosen pane meets modern building standards. Expert glaziers can advise on precisely the right thickness and type for your unique environment.
Step-by-step guide to sash window glazing
Sash windows, with their classic sliding mechanics, require a nuanced approach due to the weight and movement of the frames. Working on them demands a careful sequence to avoid damaging the delicate internal components that aid their operation. A methodical approach ensures your sash cords and pulleys remain undisturbed while the glass is refreshed.
Safely removing old putty and loose glass
Begin by slowly working the glazing knife underneath the old, brittle putty. Use a heating tool if the putty is particularly stubborn, but monitor it closely to avoid charring the wood. The goal is to pry away the old sealant without putting excessive pressure on the sash frame itself.
Preparing the rebates for new panes
Your rebate should be clean, smooth, and free of any debris or old sealant residue. Use sandpaper or a scraper to ensure a perfectly even base for the new glass. If the wood appears dry or weathered, apply a thin coat of wood primer, which helps the new putty adhere securely and prevents future moisture issues.
Applying the glazing compound and securing beads
Lay a thin bed of glazing compound exactly where the glass will sit. Press the pane gently into this bed to create an airtight contact, then apply more compound to form a neat, triangular fillet. If your sash window uses modern beads, secure them with stainless steel pins that won’t rust over time.
Achieving a professional finish and airtight seal
Use a glazing spoon or a clean cloth to smooth the compound into a uniform, professional finish. Wipe away any excess oil or residue from the edges of the light to ensure a clean appearance. An airtight seal prevents condensation and drafts, completing the job to a high standard.
Common mistakes to avoid during glazing maintenance
Avoiding common errors can be the difference between a quick repair and a lingering problem that requires another visit. Many issues stem from rushing the prep work or using the wrong chemical binders. Paying close attention to detail saves your windows from long-term stress and premature failure.
Over-tightening fasteners and causing stress fractures
While we want windows to be secure, over-tightening screws or glazing clips puts undue pressure on the glass edges. Glass is prone to expansion and contraction, so it requires just enough room to sit comfortably in its mount. Tightening too aggressively creates micro-cracks that will eventually lead to complete pane failure.
Using incompatible sealants that fail over time
Not all silicones are created equal; some acidic sealants can actually corrode certain modern window finishes or metallic spacers. Always check the manufacturer specifications to ensure your choice is intended for window glazing. A failed seal is often a result of using a general-purpose product that lacks UV stability.
Failing to prime wood before glazing
Exposed wood absorbs the oils directly from the glazing putty, causing it to dry out, shrink, and become brittle. Priming the frame first acts as a moisture barrier and prevents the wood from leeching essential oils from the sealant compound. This simple preparatory step is crucial for the longevity of your window repairs.
Ignoring safety precautions when working at heights
Repairing windows on upper levels requires proper scaffolding or a secured ladder setup. Trying to reach over or work on a ladder at an awkward angle is a primary source of accidents in glazing work. Always use the appropriate access equipment provided by a professional service if you lack the necessary training or gear.
Finding a professional glazing repair service
When a repair looks too complicated to handle internally, professional assistance is the safest choice. Reputable glaziers bring years of experience and specialized knowledge to your home or business, ensuring that safety standards are consistently met. Choosing the right provider means considering their track record and commitment to quality outcomes.
Verifying accreditations and insurance documentation
Always confirm that the company holds valid liability insurance and professional certifications. Reputable glazing contractors will happily demonstrate their compliance with local building regulations. This verification step protects you from liability and ensures the work will meet the high standards expected for structural glass.
Requesting quotes for specific repair types
Be as detailed as possible when describing your problem, including the window type, location, and the specific failure observed. Detailed descriptions help the glazing repair team provide an accurate estimate. Getting a written quotation for your project prevents misunderstandings and defines the expected scope of work clearly and directly.
Evaluating testimonials and past project history
Look for providers that have a proven history of success in your local area. Client feedback and project case studies offer authentic insight into how a company handles project hurdles. When customers mention consistent communication and cleanliness, these are reliable indicators of a professional, service-oriented business.
Understanding warranty terms for glazing work
Reliable glazing repairs often come with a warranty covering both materials and the quality of workmanship. Read your contract before the work begins to understand what incidents are covered and for how long. A valid, multi-year guarantee on units provides significant peace of mind that your investment will last.
Conclusion
Properly managing your glazing requirements ensures that your property remains energy-efficient, secure, and visually appealing for years to come. By staying proactive with your inspections and choosing professional assistance when needed, you can address minor cracks and seal failures before they develop into more complicated issues. Whether you choose to perform minor maintenance yourself or bring in trusted experts, investing in quality materials and proper techniques is the most effective approach to preserving window longevity.
Frequently Asked Questions
How can I tell if my window seal is broken?
The most obvious sign is internal fogging or trapped moisture between panes that you cannot wipe away from the outer or inner surface.
Can cracked window glass be repaired instead of replaced?
Minor superficial chips and small cracks can sometimes be repaired using clear resin, but larger fractures typically require a full unit replacement for safety.
Do I need to remove the whole window frame to replace the glass?
In most cases, you can remove the glass pane itself by carefully releasing the glazing beads or putty without disturbing the primary window frame.
What type of sealant is best for double glazing?
Neutral-cure silicone sealant is typically recommended as it is durable, weather-resistant, and compatible with most modern window materials and finishes.
Why does condensation form on the outside of my windows?
External condensation is actually a positive sign that your glass has high insulation properties, as the pane remains colder than the ambient temperature when dew points occur.
How long should professional window repairs typically take?
Simple repairs like a single glass replacement may take only a few hours, though timeframes depend on the complexity of the frame and the availability of materials.
Is it safer to keep original historic glass?
Original glass often has unique aesthetic properties, and it can be retained during frame restoration if you opt for secondary glazing solutions that improve insulation without replacing the original panes.